Indoor Positioning Made Easy with Apple's Core Location for iOS
Smart phone users are familiar with the iconic blue dot representing their live location on Apple Maps and Google Maps. This feature is a must when navigating unfamiliar city streets and sidewalks. However, upon entering a new indoor location this blue dot becomes unresponsive, leaving one stranded to find their own way. Add radio interference and unpredictable user location to the mix and GPS tracking becomes thoroughly inaccurate. Thankfully, Mappedin's indoor maps provide their own Blue Dot feature which can ingest positioning data from most IPS providers.
With iPhone, this process couldn't be easier. Apple devices have indoor positioning services built in at the OS level. This feature known as Core Location can be tied into the Mappedin SDK to enable Blue Dot positioning with relative ease.
Setup
If you haven't already, follow Mappedin's Getting Started with iOS guide on the Developer Portal to integrate your Mappedin map with an Xcode project.
To take full advantage of Core Location, you'll want to use a Mappedin venue which has been properly fingerprinted for Apple IMDF. You can find more information on this process in our Product 101: IMDF Export blog post. If you have questions related to IMDF with Mappedin, don't hesitate to reach out to our team.
Requesting Authorization
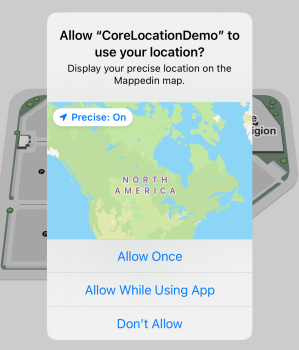
When working with user location, privacy should be at the forefront of our mind. Before we can get a user's precise location, we need to prompt them for permission. For this application, we only need to request "When In Use" authorization, so the user can view themselves on the map. Read more about choosing authorization on Apple's developer documentation.

Apple requires that we write a message to the user explaining why we need their authorization. We achieve this by adding a new string to the Information Property List and implementing a few methods from the CLLocationManagerDelegate protocol. In Xcode, open Info.plist and create a new key of type String. Name this key NSLocationWhenInUseUsageDescription. For the value, write a clear message for the user indicating why you need their location.

With the above string in place, our project is configured with everything we need. We'll proceed by triggering our prompt when the view loads so we can begin updating the map right away.
Implementing Core Location
In your ViewController, begin by importing the Core Location package and adding the protocol to your class or extension. You should already have import Mappedin and the MPIMapViewDelegate setup with an existing map view.
Then, in viewDidLoad create the CLLocationManager and set the delegate to self. This way we can access the location functions implemented by the delegate.
import UIKitimport Mappedinimport CoreLocation
class ViewController: UIViewController, MPIMapViewDelegate, CLLocationManagerDelegate { var locationManager: CLLocationManager?
override func viewDidLoad() { super.viewDidLoad() // Set up CLLocationManager locationManager = CLLocationManager() locationManager?.delegate = self
//... your other init functions }}Now that the CLLocationManager is being created when the view comes into focus, we can enable the authorization prompt mentioned earlier. This can be done by adding the locationManagerDidChangeAuthorization function. In this function we will check the current authorization status and act accordingly. There are 5 authorization cases but we can ignore authorizedAlways since we are not requesting that level of permissions.
func locationManagerDidChangeAuthorization(_ manager: CLLocationManager) { switch manager.authorizationStatus { case .authorizedWhenInUse: print("Authorized when in use") manager.startUpdatingLocation() break case .restricted, .denied: print("Denied") break case .notDetermined: print("Not determined") manager.requestWhenInUseAuthorization() default: break }}This will run as soon as the view has loaded. If authorization has not yet been determined, we use requestWhenInUseAuthorization() to open the prompt. If the user has already approved, we run startUpdatingLocation() to start collecting position data.
Updating Blue Dot Position
With all the pieces now in place, we can enable the Blue Dot on the map and begin updating its live location. The MPIMapViewDelegate implements a function called onFirstMapLoaded. This callback function is triggered when the map completes its initial load. This is a great time to enable the Blue Dot.
func onFirstMapLoaded() { mapView?.blueDotManager.enable(options: MPIOptions.BlueDot(smoothing: false))}It is recommended to disable Blue Dot smoothing for locations which have completed Apple IMDF fingerprinting. For more information, Mappedin's Developer Portal has an extensive guide on enabling Blue Dot on iOS.
All that's left is to pass the location data from Core Location to Mappedin Blue Dot. Add the didUpdateLocations function and retrieve the first (most recent) location in the list. Finally, create a new MPICoordinates object using the location values and pass that to blueDotManager.updatePosition() like the snippet below. For floorLevel, supply the index of the current map.
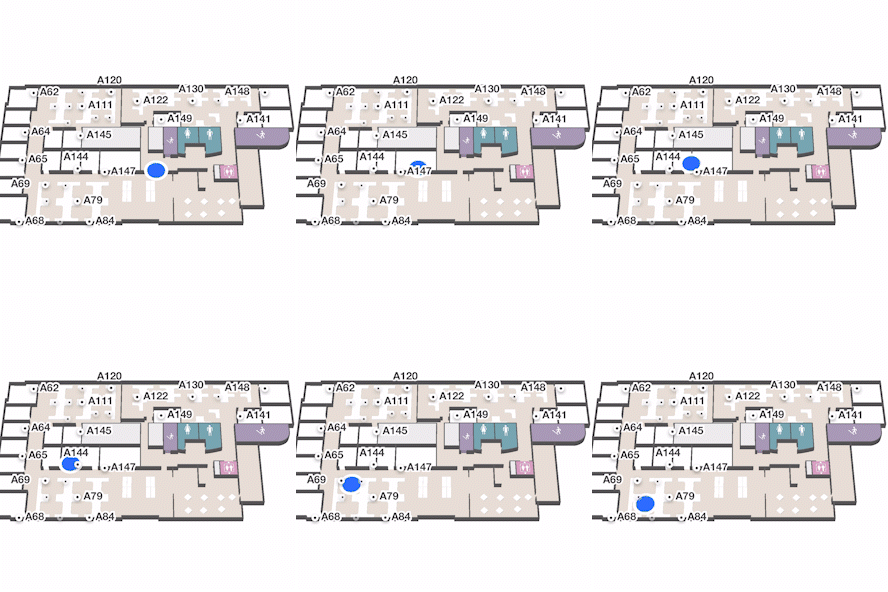
func locationManager(_ manager: CLLocationManager, didUpdateLocations locations: [CLLocation]) { guard let location = locations.first else { return } let coords = MPICoordinates(latitude: location.coordinate.latitude, longitude: location.coordinate.longitude, accuracy: location.horizontalAccuracy, floorLevel: 0) mapView?.blueDotManager.updatePosition(position: MPIPosition(coords: coords))}The Blue Dot should now follow your precise location on the map based on the geo-coordinates from Core Location. The short video below demonstrates this all working together as a user walks around in the Mappedin office.

To read more information about the Mappedin SDKs and features, visit our Developer Portal.
You may also like
Feature 101: Blue Dot
We’ve come a long way since the days of the 'You Are Here' icon on printed maps. People now turn to their phones and have become accustomed to a staple of...
Web App
Article